
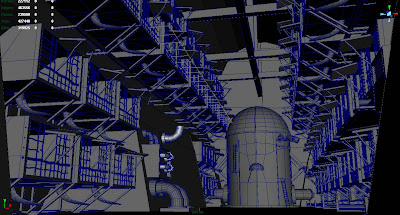
Early during the modelling stage however, it became evident that it wasn't turning out very well. I wasn't happy with the way it was going, as it didn't come across as enough of rickety old banger. the problem was that it had too low a ground clearance, which actually made it look quite stable. Also, with the current model (below), I knew there would be problems with the 'jiggle' dynamics brought about by the vehicle's aging suspension. The wheels were simple too close to the frame which would mean that if the car 'jiggled', the wheels would hit or worse, pass through the frame. The whole thing needed to be higher.

Enter old rusty rickety truck mark II (below). This new design deviates from the original picture, however is more practical and just generally more aesthetically pleasing as a model. It resembles an old military transport truck more than the original image, although I kept the front as I wanted to keep to the whole vintage look. The body no had a higher ground clearance, and the wheels had enough space for the body to bounce around when the truck is in motion. The cage as the back would also be jiggle around while the truck's moving.

The image below is a more developed version. Luke pointed out that with the previous model (above), the underside looked empty and needed something to fill in the space. My original intention was to occupy that space with random components, such as pipes, oil tanks, tubes, etc. However, Luke recomended that I should just have the same design on the front on the back end as well. I think this actually looks better than having random machinery at the botom. This was done literally by duplicating the body, flipping it around 180 degrees, then cutting and merging it into place. This gives the truck a more solid body and also avoids me putting in uneccessary detail on the underside.
I also applied an ambient occlusion map on the model by baking out a light map and applying it as a texture. This just gives me a rough idea of what it'll look once AO has been applied. Texturing-wise, it's also very handy as it shows you exactly which parts of the mesh is elevated and which parts are sunken, making it easier to paint in shadows and details like scratches and such. 
This next image is a partially textured version of the truck. This is still under heavy construction in terms of texture design. I knew I was going for the brown and rusty look, but at this stage I was still messing about with actual details on the texture such as bolts, metal plates, etc.
Originally, the truck was split into four UV sets, each taking up its own quadrant in the texture editor. My reasoning for this was that in order for the truck to have as much detail and definition, each texture would have to be massive. It was originally 4 x (2048 x 2048). This of course is massive, plus I was unhappy with the way I'd mapped the whole thing as I was getting some really ugly seams at very exposed areas. It was simply more work to try and hide them, than to simply re-map the whole thing. This actually didn't take too long to do, and once the UV sets were layed out, I now only had two UV sets. One was for the body, cage, and cavas cover, which was a 2048 texture, and the other was for all the random bits and pieces on the underside of the truck such as wheels, drive shafts, mudflaps etc. This latter texture was only a 1024 x 1024. Although you can clearly see the difference in quality between the two texture sizes, once it was rendered with a bit of lighting, this actually became less and less noticable. Even more so if the truck is animated.
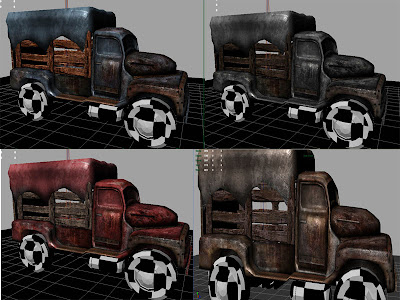
These four images were experiments of the different colours scheme of the truck. The differences aren't very definable in this picture, but they are blue, red, brown, and grey. This was Luke's idea, as aparently the orginal one was too brown and needed more colour. The cheek! He said he wanted it to be more red. After some faffing around in Photoshop, I came up with a mock up to which he said "hmmmm....nah actually I rather like that first one you did to be honest". Aparently it was too red. Back to the original brown it is. That said, I realised that it wasn't actually the red that made it too agressive, it was the amount of rust and grunge detail that I'd put on the texture. There was so much rust that it already looked as if it was going to crumble into dust any second, so I toned it down sinificantly, and adjusted the contrast levels in Photoshop to make it slightly lighter.
This is a displacement map test I was playing around with. If you can't tell, it's the bolts and that long metal bar thing sticking out of the bonnet that's been displaced. Otherwise the whole thing is just texture. I abandoned the idea of using Displacement Maps since I thought that the truck's only going to be featured in the opening scene, and even then you'll never actually be close enough to notice any displacement. It would've therefore been a waste of time, and would have bumped up rendering time that little bit more, so I'm sticking to the modest bump map for this one. With Specular too of course.
This is a 'test render' of the fully textured version. The underside is still unfinished at this stage, plus the windows need some alpha maps for transparency. I just wanted to see how it'd look under a production quality render with mental ray. This took roughly 20-25 seconds, which isn't too bad considering the opening scene is only going to be so many frames.
There is something which really drove me crazy about this, and that's the quality of the render. For some reason, it looks infinitely more clear and crisp under hardware render in the viewport, than with actual mental ray itself. Mental ray seems to to blur out the texture unless the camera's literally right next to the model. After tweaking every setting in mental ray and yielding very little results, I gave up.....

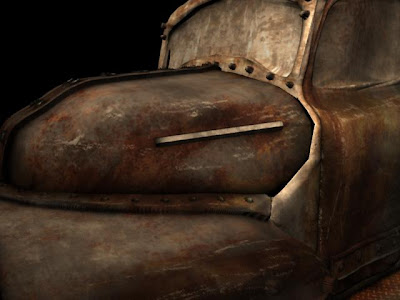
.....or did I?! The image below if the fully finished version (minus rigging and dynamics). As you can see, it's definitely much more crisp and sharp than the mental ray version. This image also has an AO pass over it set at multiply. However, the sharpness wasn't achieved with the mighty mental ray, but with the ever humble and user friendly Adobe Photoshop. Basically what I'll just have to do is create an Action in Photohsop which will in turn apply the same filter to every frame of the render. Sorted!

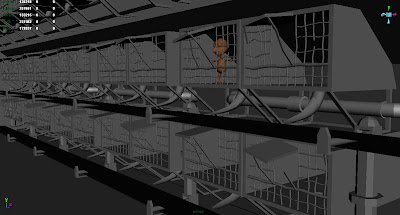
This is a quick dynamics test I did. It utilises a very simple rig; the crate is attached to the main body, and the main body is in turn attached to the underside frame, therefore, once in motion, if the underside stops abruptly, the main body jerks forward and jiggles, and the cage in turn jerks and jiggles. The jiggle effect is done through the use of hair follicles attached to the rig.
This is basically ready for use in the scene. If needs be, it can be tweaked very easily.


